Share a screen using Daily's iOS SDK

Screen sharing enables the local participant to display the contents of their screen to other users in the meeting.

Before you begin, ensure that you understand how to start a video call. For details, see our Introduction to the Daily Client SDKs for Android and iOS.

Screen share for iOS is composed by two parts: broadcast upload extension, screen share support inside daily-ios.

This guide will describe how to implement screen sharing using the iOS SDK, show you some examples, and point you to where you can learn more.

How to create a broadcast upload extension

In order to use the screen sharing functionality for iOS, you will need to create a Broadcast Upload Extension for your app.

The DailySystemBroadcast framework provides all the files needed for capturing the contents of the user's screen and sending it to Daily.

Follow the steps below to learn how to create a new broadcast upload extension using Daily's framework.

  1. Ensure that DailySystemBroadcast framework is integrated into the project. You can find the details about how to install broadcast extension framework in our installation guide.

  2. Create a new Broadcast Upload Extension target in Xcode.
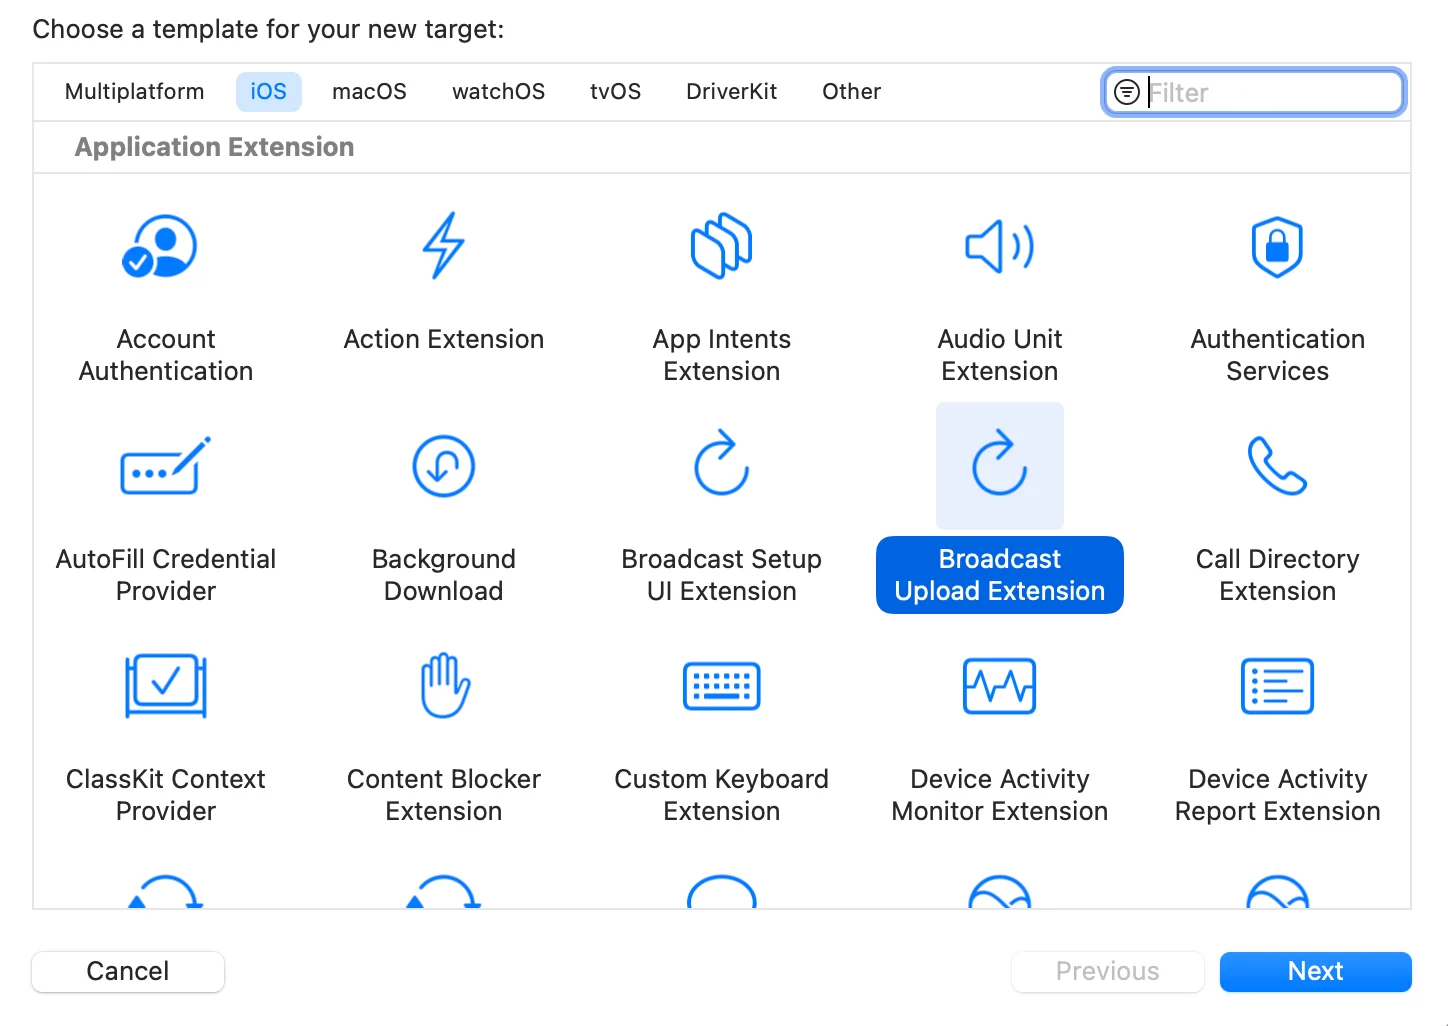
new_upload_extension.png

  • Do not select "include UI extension".
  • Recommended naming: ScreenCaptureExtension, since it’s an independent process responsible for ingesting and processing the captured video & audio frames that the OS captures and passing it to your app, which then actually sends the media via WebRTC.
  1. Add the DailySystemBroadcast framework as dependency of your app target and of your new ScreenCaptureExtension target.

  2. Add the same App Group capability in your main app target as well as in this new Broadcast Upload Extension target.

  3. Replace your SampleHandler.swift default code that has been created by this code below:

    import DailySystemBroadcast
    public class SampleHandler: DailyBroadcastSampleHandler {
    override init() {
    super.init(appGroupIdentifier: "group.replace.yours.app.group.identifier")
    }
    }
  • Remember to change the appGroupIdentifier to use yours.
  1. Edit your app target’s Info.plist

    • Add an RTCAppGroupIdentifier key with your app group identifier.
    • Add a DailyScreenCaptureExtensionBundleIdentifier key with your screen share extension’s bundle identifier.

    If you view the raw file contents of Info.plist, it should look like this:

    <dict>
    ...
    <key>DailyScreenCaptureExtensionBundleIdentifier</key>
    <string>yours.broadcast.upload.extension.identifier</string>
    <key>RTCAppGroupIdentifier</key>
    <string>group.replace.yours.app.group.identifier</string>
    <key>CFBundleDevelopmentRegion</key>
    ...
    </dict>

You can find the details about how to install broadcast extension framework in our installation guide.

How to start the broadcast upload extension

In order to start the broadcast upload extension, you should use the native component RPSystemBroadcastPickerView.

The following code snippet shows how you should setup the RPSystemBroadcastPickerView to open the right extension.

import UIKit
import Daily
class CallViewController: UIViewController {
@IBOutlet private weak var systemBroadcastPickerView: UIView!
override func viewDidLoad() {
super.viewDidLoad()
// Defining to open the broadcast upload extension that you have created
let systemBroadcastPickerView = self.systemBroadcastPickerView as! RPSystemBroadcastPickerView
systemBroadcastPickerView.preferredExtension = "yours.broadcast.upload.extension.identifier"
systemBroadcastPickerView.showsMicrophoneButton = false
}
}

How to start a screen share

The following code snippet shows how you might start a screen share:

import UIKit
import Daily
class CallViewController: UIViewController {
// Create call client
let call: CallClient = .init()
override func viewDidLoad() {
super.viewDidLoad()
// Set the delegate, so we can receive the listeners when the screen capture has started or stopped
self.call.delegate = self
}
}
// to listen to events, use the CallClientDelegate Swift protocol:
extension CallViewController: CallClientDelegate {
// Once the screen capture has started we can invoke the Daily SDK to start screen share
func callClientDidDetectStartOfSystemBroadcast(
_ callClient: CallClient
) {
logger.debug("System broadcast started")
callClient.updateInputs(
.set(screenVideo: .set(isEnabled: .set(true))),
completion: nil
)
}
// ... others not shown
}

To confirm that screen sharing started, listen for callClient(CallClient, inputsUpdated: InputSettings) and check the property screenVideo.

How to stop screen share

The following code snippet shows how you might stop a screen share:

import UIKit
import Daily
class CallViewController: UIViewController {
// Create call client
let call: CallClient = .init()
override func viewDidLoad() {
super.viewDidLoad()
// Set the delegate, so we can receive the listeners when the screen capture has started or stopped
self.call.delegate = self
}
}
// to listen to events, use the CallClientDelegate Swift protocol:
extension CallViewController: CallClientDelegate {
// Once the screen capture has stopped we can invoke the Daily SDK to stop screen share
public func callClientDidDetectEndOfSystemBroadcast(
_ callClient: CallClient
) {
logger.debug("System broadcast ended")
callClient.updateInputs(
.set(screenVideo: .set(isEnabled: .set(false))),
completion: nil
)
}
// ... others not shown
}

How to check if the local screen sharing is enabled

The following code snippet shows how you might check if the local screen sharing is enabled:

class CallViewController: UIViewController {
// Create call client
let call: CallClient = .init()
private var screenIsEnabled: Bool {
// checking if the local screen share is enabled
self.call.inputs.screenVideo.isEnabled
}
}

Demo app

To see a working example of how to interact with the Daily Client SDK for screen sharing, see our iOS demo app.